ラベルに対応した色も表を作る (クロスステッチデータを作る 第5回 (最終回) )
本日の課題と目標
ラベルごとの色データを抽出する
Excelに色データを書き込む
Excelのセルに色を付ける
はじめに
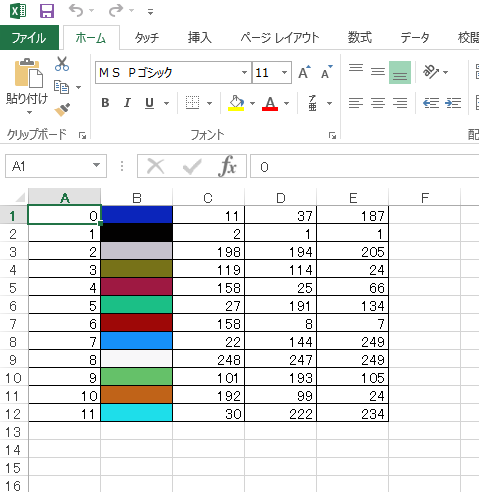
以前のcv2.kmeans関数の戻り値3はラベルに対応した色情報でした。それを利用して今回はExcelでラベルに対応した色の表を作成しようと思います。
ラベル、色見本、R、G、Bを表にします。
プログラム
# -*- coding: utf-8 -*-
import cv2
import numpy as np
import openpyxl
from openpyxl.styles.borders import Border, Side
from openpyxl.styles import Font

# 減色処理
def sub_color(src, K):
    # 画面サイズを確認
    size_y,size_x,zzz = src.shape

    print(src.shape)

    # 次元数を1落とす
    Z = src.reshape((-1,3))
    # float32型に変換
    Z = np.float32(Z)
    # 基準の定義
    criteria = (cv2.TERM_CRITERIA_EPS + cv2.TERM_CRITERIA_MAX_ITER, 10, 1.0)
    # K-means法で減色
    ret, label, center = cv2.kmeans(Z, K, None, criteria, 10, cv2.KMEANS_RANDOM_CENTERS)
    # UINT8に変換
    center = np.uint8(center)
    res = center[label.flatten()]


    # Excelファイルを作成
    book = openpyxl.Workbook()
    # シートの指定
    sheet = book.active
    # 罫線(外枠)を設定
    border = Border(top=Side(style='thin'),
                    bottom=Side(style='thin'),
                    left=Side(style='thin'),
                    right=Side(style='thin'))
    # 罫線とフォント
    for i in range(size_y):
        for j in range(size_x):
            # 罫線を引く
            sheet.cell(row=i + 1 ,column=j + 1).border = border
            # 文字の大きさを変更
            sheet.cell(row=i + 1 ,column=j + 1).font = Font(size=7)
    # セルの幅・高さを変更
    # 行の高さを変更
    for i in range(size_y):
        sheet.row_dimensions[i + 1].height = 12
    # 列の幅を変更
    for j in range(size_x):
        # openpyxl.utils.get_column_letterを使って列「1」を 列「A」に変換
        sheet.column_dimensions[openpyxl.utils.get_column_letter(j + 1)].width = 2

    # ラベルデータの書き込み
    n = 0
    for i in range(size_y):
        for j in range(size_x):
            sheet.cell(row=i + 1,column=j + 1).value = int(label[n])
            # カラーコードの変換
            html_color = '%02X%02X%02X' % (center[int(label[n]), 0],center[int(label[n]), 1],center[int(label[n]), 2])
            # 背景色を変更
            sheet.cell(row=i + 1,column= j + 1).fill = openpyxl.styles.PatternFill(patternType='solid',fgColor=html_color, bgColor=html_color)
            n = n + 1

    # ブックの保存
    book.save('テスト.xlsx')


    # Excelファイルを作成
    book = openpyxl.Workbook()
    # シートの指定
    sheet = book.active
    # 罫線(外枠)を設定
    border = Border(top=Side(style='thin'),
                    bottom=Side(style='thin'),
                    left=Side(style='thin'),
                    right=Side(style='thin'))
    # 罫線とフォント
    for i in range(K):
        for j in range(5):
            # 罫線を引く
            sheet.cell(row=i + 1 ,column=j + 1).border = border

    for i in range(K):
        # ラベル列の書き込み
        sheet.cell(row=i + 1,column=1).value = i
        # RGB列の書き込み
        for j in range(3):
            sheet.cell(row=i + 1,column=j + 3).value = center[i, j]
        # カラーコードの変換
        html_color = '%02X%02X%02X' % (center[i, 0],center[i, 1],center[i, 2])
        # 背景色を変更
        sheet.cell(row=i + 1,column=2).fill = openpyxl.styles.PatternFill(patternType='solid',fgColor=html_color, bgColor=html_color)


    # ブックの保存
    book.save('テスト2.xlsx')


    print(label.shape)
    print(center.shape)
    #print(ret)
    #print(label)
    print(center)
    #print(res)

    # 配列の次元数と入力画像と同じに戻す
    return res.reshape((src.shape))


def main():
    # 入力画像とスクリーントーン画像を取得
    img = cv2.imread("input.jpg")
    # 減色処理(三値化)
    dst = sub_color(img, K=12)
    # 結果を出力
    cv2.imwrite("output.jpg", dst)


if __name__ == '__main__':
    main()


解説
配列の抜き出し
多次元の場合は、カンマ(,)で区切ってそれぞれを指定する。
配列の変数[何行目, 何列目]
(最初の値は、0行目, 0列目となるので注意)
行を抽出する
配列の変数[何行目, :]
列を抽出する
配列の変数[:, 何列目]
Excelのセルに色を付ける
sheet[セル番号].fill = openpyxl.styles.PatternFill(patternType='solid',fgColor='FF0000', bgColor='FF0000')
「patternType」の「solid」は塗りつぶし
「FF0000」の部分に好きな色を指定
カラーコードの変換
10進数「255,255,255」から16進数「ffffff」に変換する
html_color = '%02X%02X%02X' % (color[0],color[1],color[2])
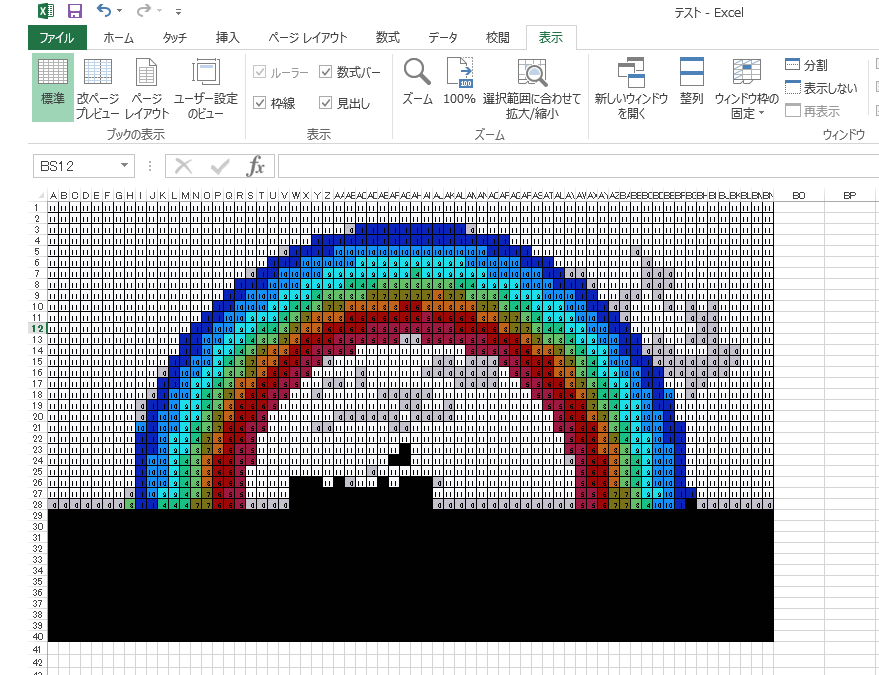
ラベルデータのExcelファイルにも色をを付けてみました。
参考サイト
虹のフリーイラストはこちらでお借りしました。
保存ファイル
lesson25.py
lesson26.py
文責:Luke